Objects
No object is so beautiful that, under certain conditions, it will not look ugly.
—Oscar Wilde
In this chapter:
Data and functionality, together at last
What is an object?
What is a class?
Writing your own classes
Creating your own objects
Processing tabs
I’m down with OOP
Before I begin discussing thedetails of how object-oriented programming (OOP) works in Processing, let’s embark on a short conceptual discussion of “objects” themselves. It’s important to understand that I am not introducing any new programming fundamentals. Objects use everything you have already learned: variables, conditional statements, loops, functions, and so on. What is entirely new, however, is a way of thinking, a way of structuring and organizing everything you have already learned.
Imagine you were not programming in JavaScript with p5.js, but were instead writing out a program for your day, a list of instructions, if you will. It might start out something like:
Wake up.
Drink coffee (or tea).
Eat breakfast: cereal, blueberries, and soy milk.
Ride the subway.
What is involved here? Specifically, what things are involved? First, although it may not be immediately apparent from how I wrote the above instructions, the main thing is you, a human being, a person. You exhibit certain properties. You look a certain way; perhaps you have brown hair, wear glasses, and appear slightly nerdy. You also have the ability to do stuff, such as wake up (presumably you can also sleep), eat, or ride the subway. An object is just like you, a thing that has properties and can do stuff.
So how does this relate to programming? The properties of an object are variables; and the stuff an object can do are functions. Object-oriented programming is the marriage of everything I covered in #pixels through #functions; data and functionality, all rolled into one thing.
Let’s map out the data and functions for a very simple human object:
Now, before I get too much further, I need to embark on a brief metaphysical digression. The above structure is not a human being itself; it simply describes the idea, or the concept, behind a human being. It describes what it is to be human. To be human is to have height, hair, to sleep, to eat, and so on. This is a crucial distinction for programming objects. This human being template is known as a class. A class is different from an object. You are an object. I am an object. The person next to you on the subway is an object. Ada Lovelace is an object. We are all people, real world instances of the idea of a human being.
Think of a cookie cutter. A cookie cutter makes cookies, but it is not a cookie itself. The cookie cutter is the class, the cookies are the objects.
Using an object
Before I look at the actual writing of a class itself, let’s
briefly look at how using objects in the main program (i.e.,
setup() and draw()) makes the world a better place.
Returning to the car example from #functions, you may recall that the pseudocode for the sketch looked something like this:
Data (Global Variables):
Car color.
Car x location.
Car y location.
Car x speed.
Setup:
Initialize car color.
Initialize car location to starting point.
Initialize car speed.
Draw:
Fill background.
Display car at location with color.
Increment car’s location by speed.
In #functions, I defined global variables at the top of the program, initialized them in setup(), and called functions to move and display the car in draw().
Object-oriented programming allows me to take all of the variables and functions out of the main program and store them inside a car object. A car object will know about its data — color, location, speed. That is part one. Part two of the car object is the stuff it can do, the methods (functions inside an object). The car can move and it can be displayed.
Using object-oriented design, the pseudocode improves to look something like this:
Data (Global Variables):
Car object.
Setup:
Initialize car object.
Draw:
Fill background.
Display car object.
Move car object.
Notice I removed all of the global variables from the first example.
Instead of having separate variables for color, location, car
speed, I now have only one variable, a car object! And
instead of initializing those three variables, I initialize one thing,
the car itself. Where did those variables go? They still
exist, only now they live inside of the car object (and will
be defined in the Car class, which I will get to in a moment).
Moving beyond pseudocode, the actual body of the sketch might look like:
let myCar;
function setup() {
  myCar = new Car();
}

function draw() {
  background(255);
  myCar.move();
  myCar.display();
}
I am going to get into the details regarding the previous code in a moment, but before I do so, let’s take a look at how the Car class itself is written.
Writing the cookie cutter
The simple car example above demonstrates how the use of object in p5.js makes for clean, readable code. The hard work goes into writing the object template, that is the class itself. When you’re first learning about object-oriented programming, it’s often a useful exercise to take a program written without objects and, not changing the functionality at all, rewrite it using objects. I will do exactly this with the car example from #functions, recreating exactly the same look and behavior in an object-oriented manner. And at the end of the chapter, I will remake Zoog as an object.
All classes typically include four elements: name, data, constructor, and methods. (Technically, the only actual required element is the class name, but the point of doing object-oriented programming is to include all of these.)
#ch08fig01 shows how you can take the elements from a simple non-object-oriented sketch and place them into a Car class, from which you will then be able to make Car objects.
-
The Class Name — The name is specified by “class WhateverNameYouChoose”. You then enclose all of the code for the class inside curly brackets after the name declaration. Class names are traditionally capitalized (to distinguish them from variable names, which traditionally are lowercase).
-
Data — The data for a class is a collection of variables. These variables are often referred to as instance variables since each instance of an object contains this set of variables.
A Constructor — The constructor is a special function inside of a class that creates the instance of the object itself. It’s where you give the instructions on how to set up the object. It’s just like p5's
setup()function, only here it’s used to create an individual object within the sketch, whenever anewobject is created from this class. It always namedconstructorand is called by invoking thenewoperator:let myCar = new Car();.Functionality — We can add functionality to an object by writing methods. These are done in the same way as described in #functions, with a return type, name, arguments, and a body of code.
This code for a class exists as its own block and can be placed anywhere outside of setup() and draw().
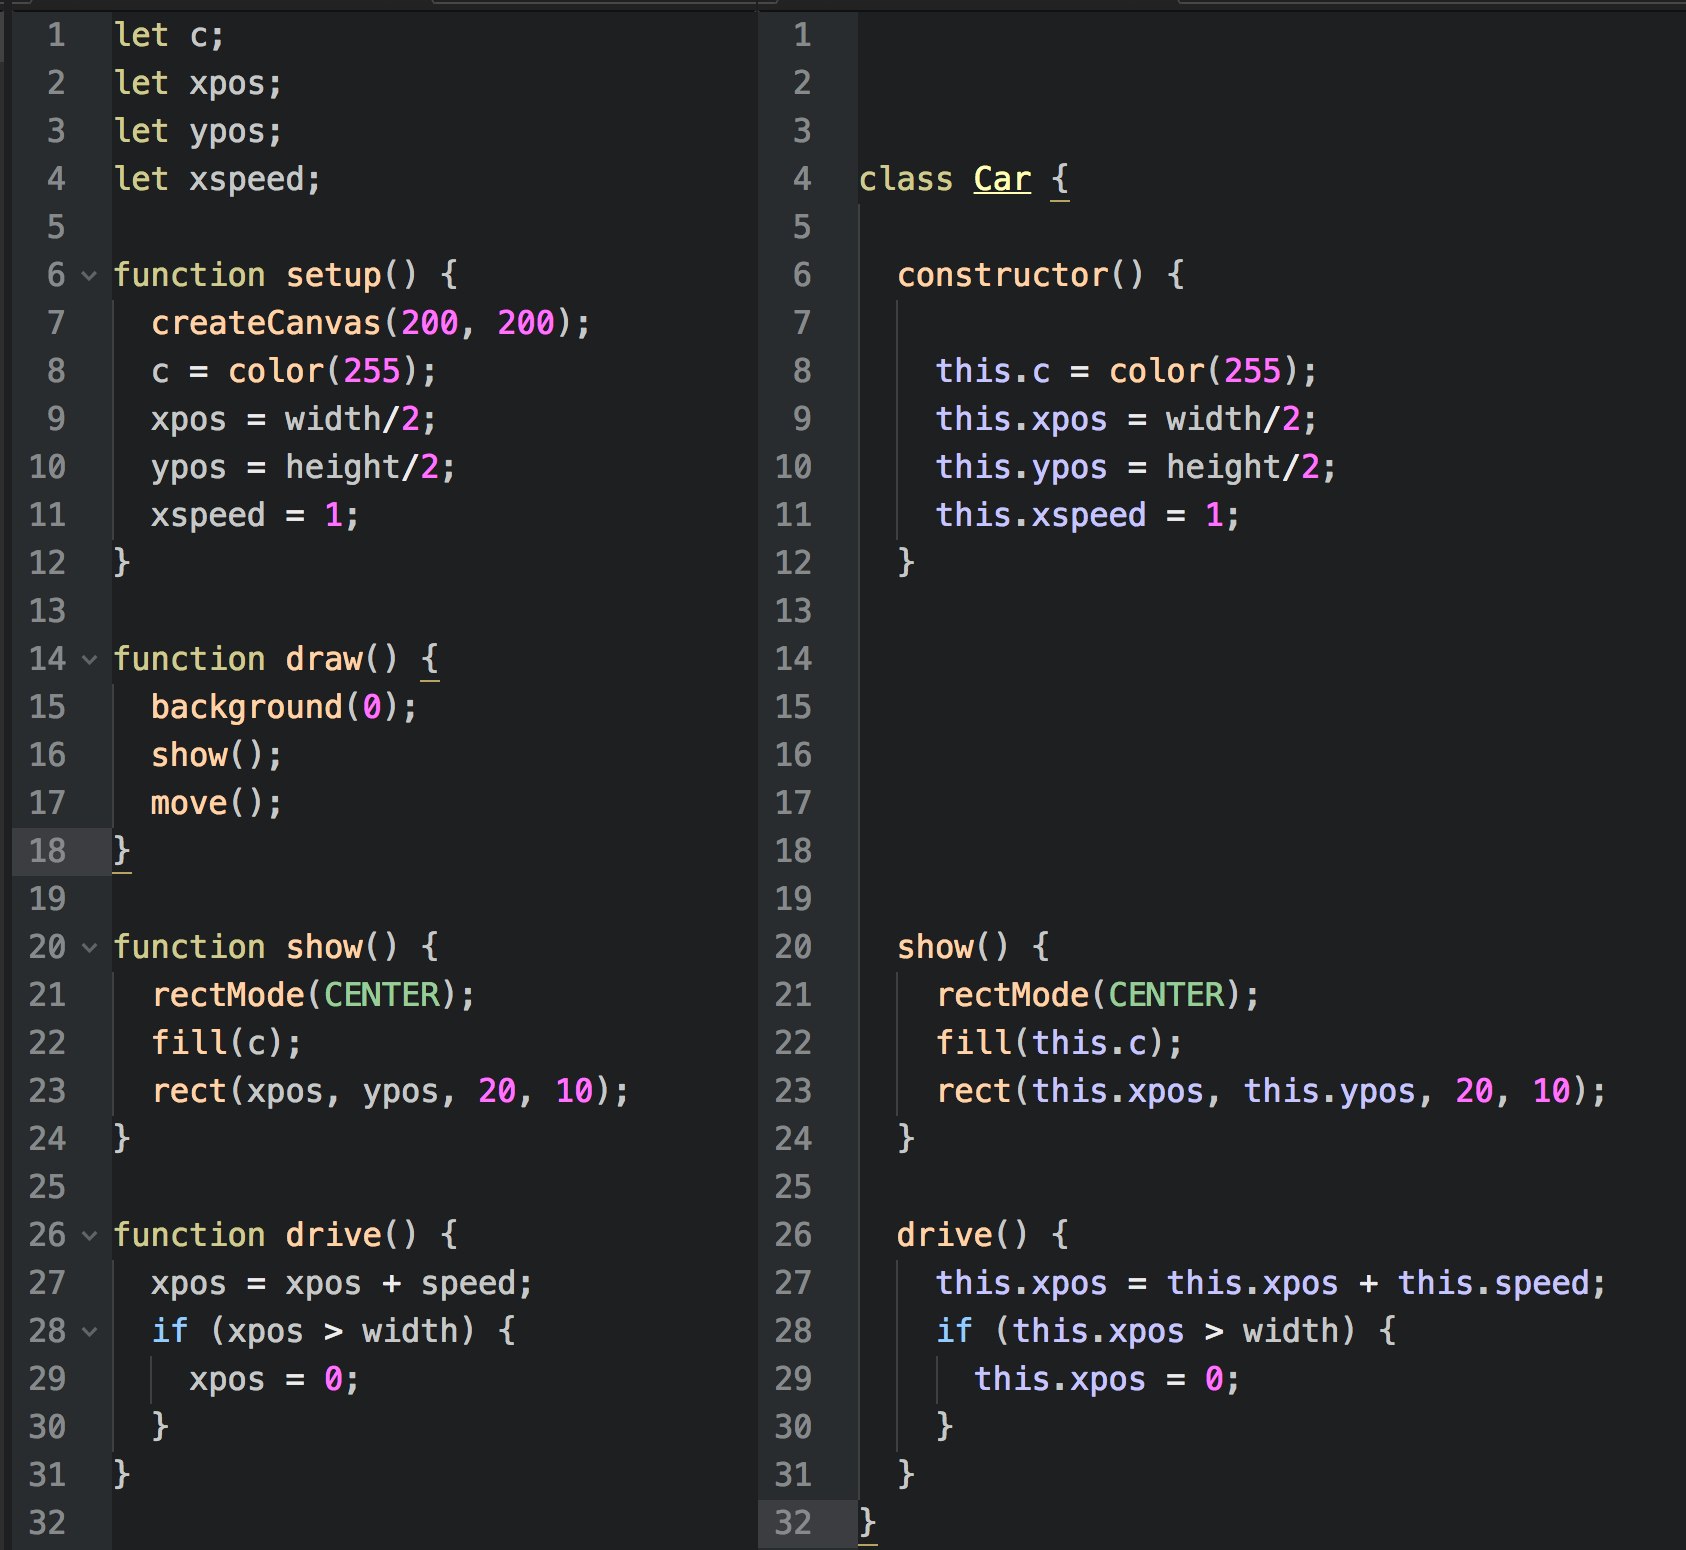
You might have noticed something a bit strange that changed moving from
global variables x, y, etc. On the left of
#ch08fig01 the variables are
declated as you might normally expect.
let xpos = width/2;
let ypos = height/2;
However, in the constructor function, the variables are declared with a new
keyword: this.
constructor() {
 this.xpos = width/2;
 this.ypos = height/2;
}
The this keyword is only going to come up again and again in
JavaScript and what it means and what it is doing are particularly tricky
to grasp. You might think of this in the broadest sense as
meaning "context." Where are we and why are we here on this line of code?
I'll get to this more in other chapters. Here, however, the
context is the class itself! And this refers to the
new object being created by the constructor. And this new object needs
properties! So when new variables are declared inside a class to be attached
to an object instance of that class, they are declared with this
rather than let.
Using an object: the details
In #using_an_object, I took a quick peek at how an object can greatly simplify the main parts of a Processing sketch (setup() and draw()).
Step 1: Declare an object.
let myCar;
function setup() {
Step 2: Initialize object.
myCar = new Car();
}

function draw() {
  background(255);
Step 3: Call methods on the object.
myCar.move();
  myCar.display();
}
Let’s look at the details behind the above three steps outlining how to use an object in your sketch.
Step 1. Declaring an object variable.
If you flip back to #variables, you may recall that a variable is declared with let followed by a name.
Variable declaration type name
let something;
Previously we've looked at examples of variables that holds onto primitives, like a number. Declaring a variable that holds onto an object is the same! Objects, incidentally, are not primitives and are considered complex data types. (This is because they store multiple pieces of information: data and functionality. Primitives only store data.)
Step 2. Initializing an object.
Again, you may recall from #variables that in order to initialize a variable (i.e., give it a starting value), I use an assignment operation — variable equals something.
Variable Initialization
something equals 10
something = 10;
Initializing an object is a bit more complex. Instead of simply assigning it a primitive value, like an integer or floating point number, you have to construct the object. An object is made with the new operator.
Object Initialization
The new operator is used to make a new object.
myCar = new Car();
In the above example, myCar is the object variable name and “=” indicates you are setting it equal to something, that something being a new instance of a Car object. What I am really doing here is initializing a Car object. When you initialize a primitive variable, such as an integer, you just set it equal to a number. But an object may contain multiple pieces of data. Recalling the Car class from the previous section, you can see that this line of code calls the constructor tfoot initializes all of the object’s variables and makes sure the Car object is ready to go.
One other thing, if you forget to initialize the variable, p5.js will give it the value undefined. undefined means nothing. Not zero. Not negative one. Utter nothingness. Emptiness. If you encounter an error in the message window that says Uncaught TypeError: Cannot read property '_______' of undefined (and this is a pretty common error), that error is likely caused by having forgotten to initialize an object. (See the Appendix for more details.)
Step 3. Using an object
Once you have successfully declared and initialized an object variable, you can use it. Using an object involves calling functions that are built into that object. A human object can eat, a car can drive, a dog can bark. Functions that are inside of an object are technically referred to as “methods” so I can begin to use this nomenclature (see #break_it_down). Calling a method inside of an object is accomplished via dot syntax:
-
variableName.objectMethod(method arguments);
In the case of the car, none of the available functions has an argument so it looks like:
Functions are called with the “dot syntax.”
myCar.draw();
myCar.display();
Putting it together with a new JavaScript file
Now that I have covered how to define a class and use an object born from that class, I can take the code from #using_an_object and #writing_the_cookie_cutter and put them together in one sketch.
A Car class and a Car object
Declare car object as a global variable.
let myCar;
function setup() {
  createCanvas(200, 200);
Initialize car object in setup() by calling constructor.
myCar = new Car();
}

function draw() {
  background(255);
Operate the car object in draw() by calling object methods using the dots syntax.
  myCar.move();
  myCar.display();
}
Define a class below the rest of the program.
class Car {
A constructor.
constructor() {
    this.c = color(255);
    this.xpos = width/2; Variables.
    this.ypos = height/2;
    this.xspeed = 1;
  }
Function.
display() {
The car is just a square
    rectMode(CENTER);
    fill(this.c);
    rect(this.xpos, this.ypos, 20, 10);
}
Function.
move() {
    this.xpos = this.xpos + this.xspeed;
    if (this.xpos > width) {
      this.xpos = 0;
    }
  }
}
You will notice that the code block that contains the Car class is placed below the main body of the program (under draw()). This spot is identical to where I placed user-defined functions in #functions. Technically speaking, the order does not matter, as long as the blocks of code (contained within curly brackets) remain intact. The Car class could go above setup() or it could even go between setup() and draw(). Though any placement is technically correct, when programming, it’s nice to place things where they make the most logical sense to our human brains, the bottom of the code being a good starting point. Nevertheless, web pages offer a useful means for separating blocks of code from each other through the use of separate JS files.
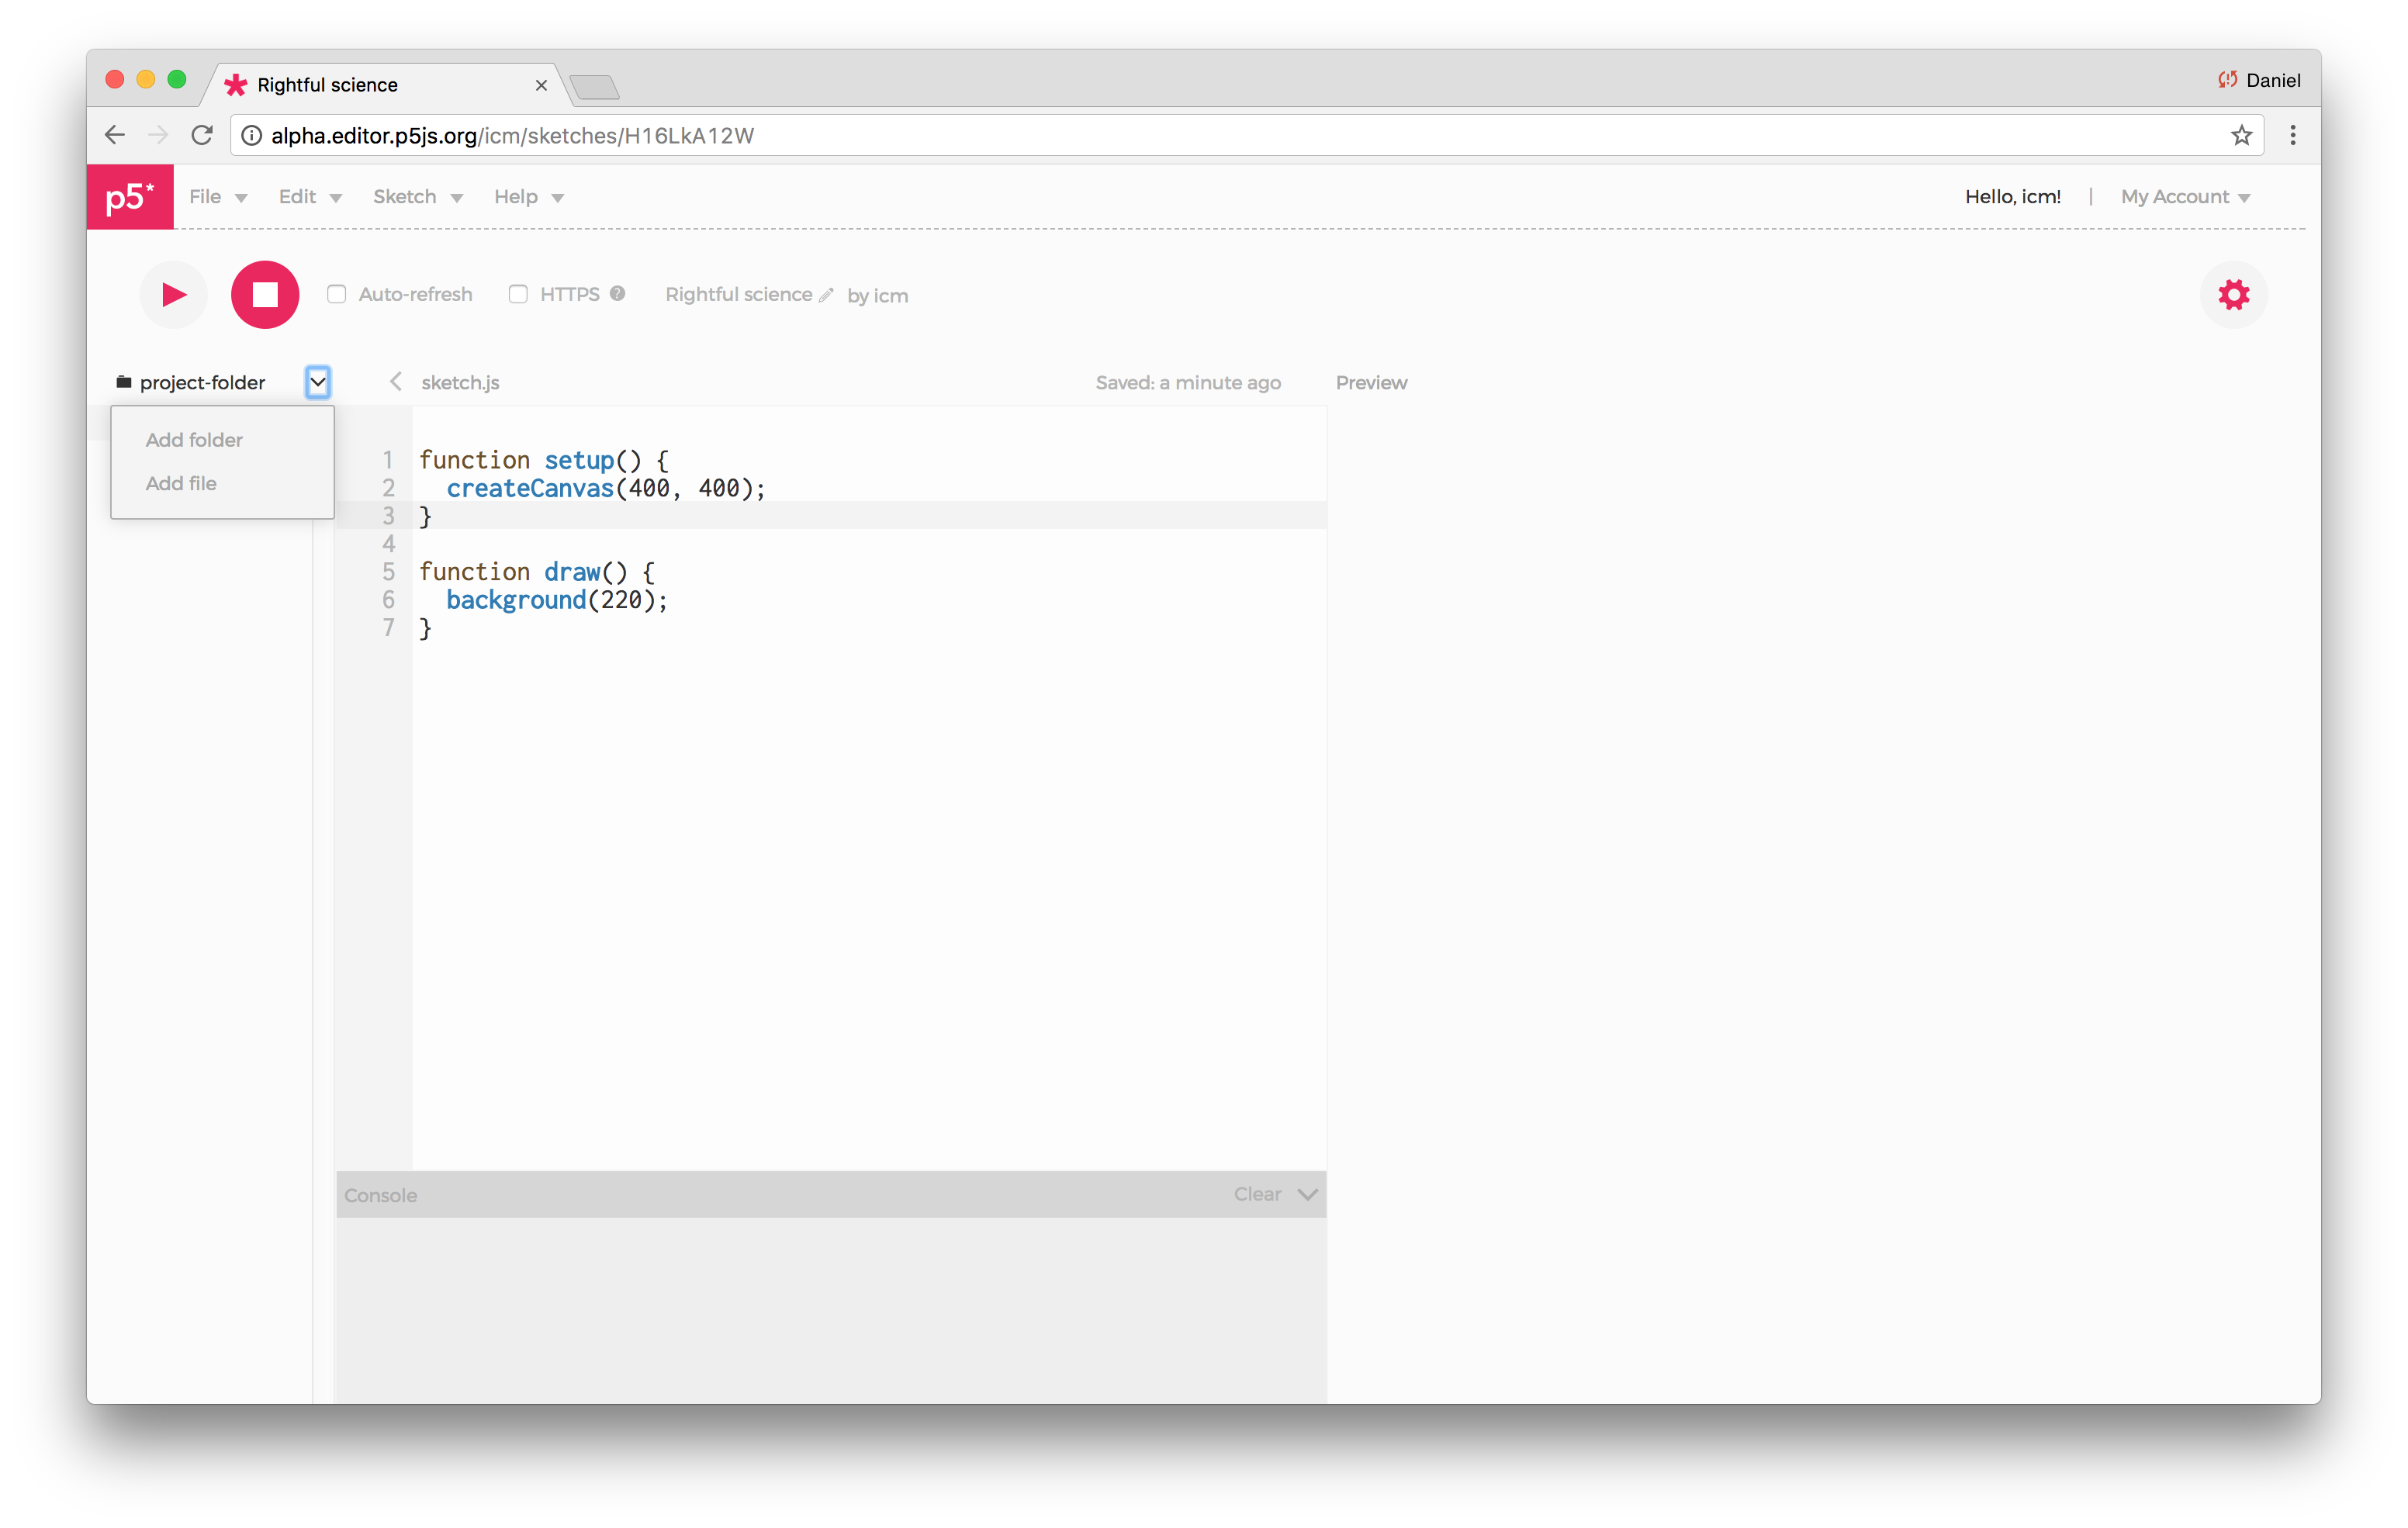
In the p5.js web editor window, look for the arrow to the left of where it says "sketch.js" to . If you click that triangle, it will reveal the "project-folder" #fig_08_02_newtab. From the project folder, you'll need to select the arrow pointing down followed by "Add File."
Upon selecting “Add file,” you will be prompted to type in a name for the new file, as shown in #fig_08_03_newfilename.
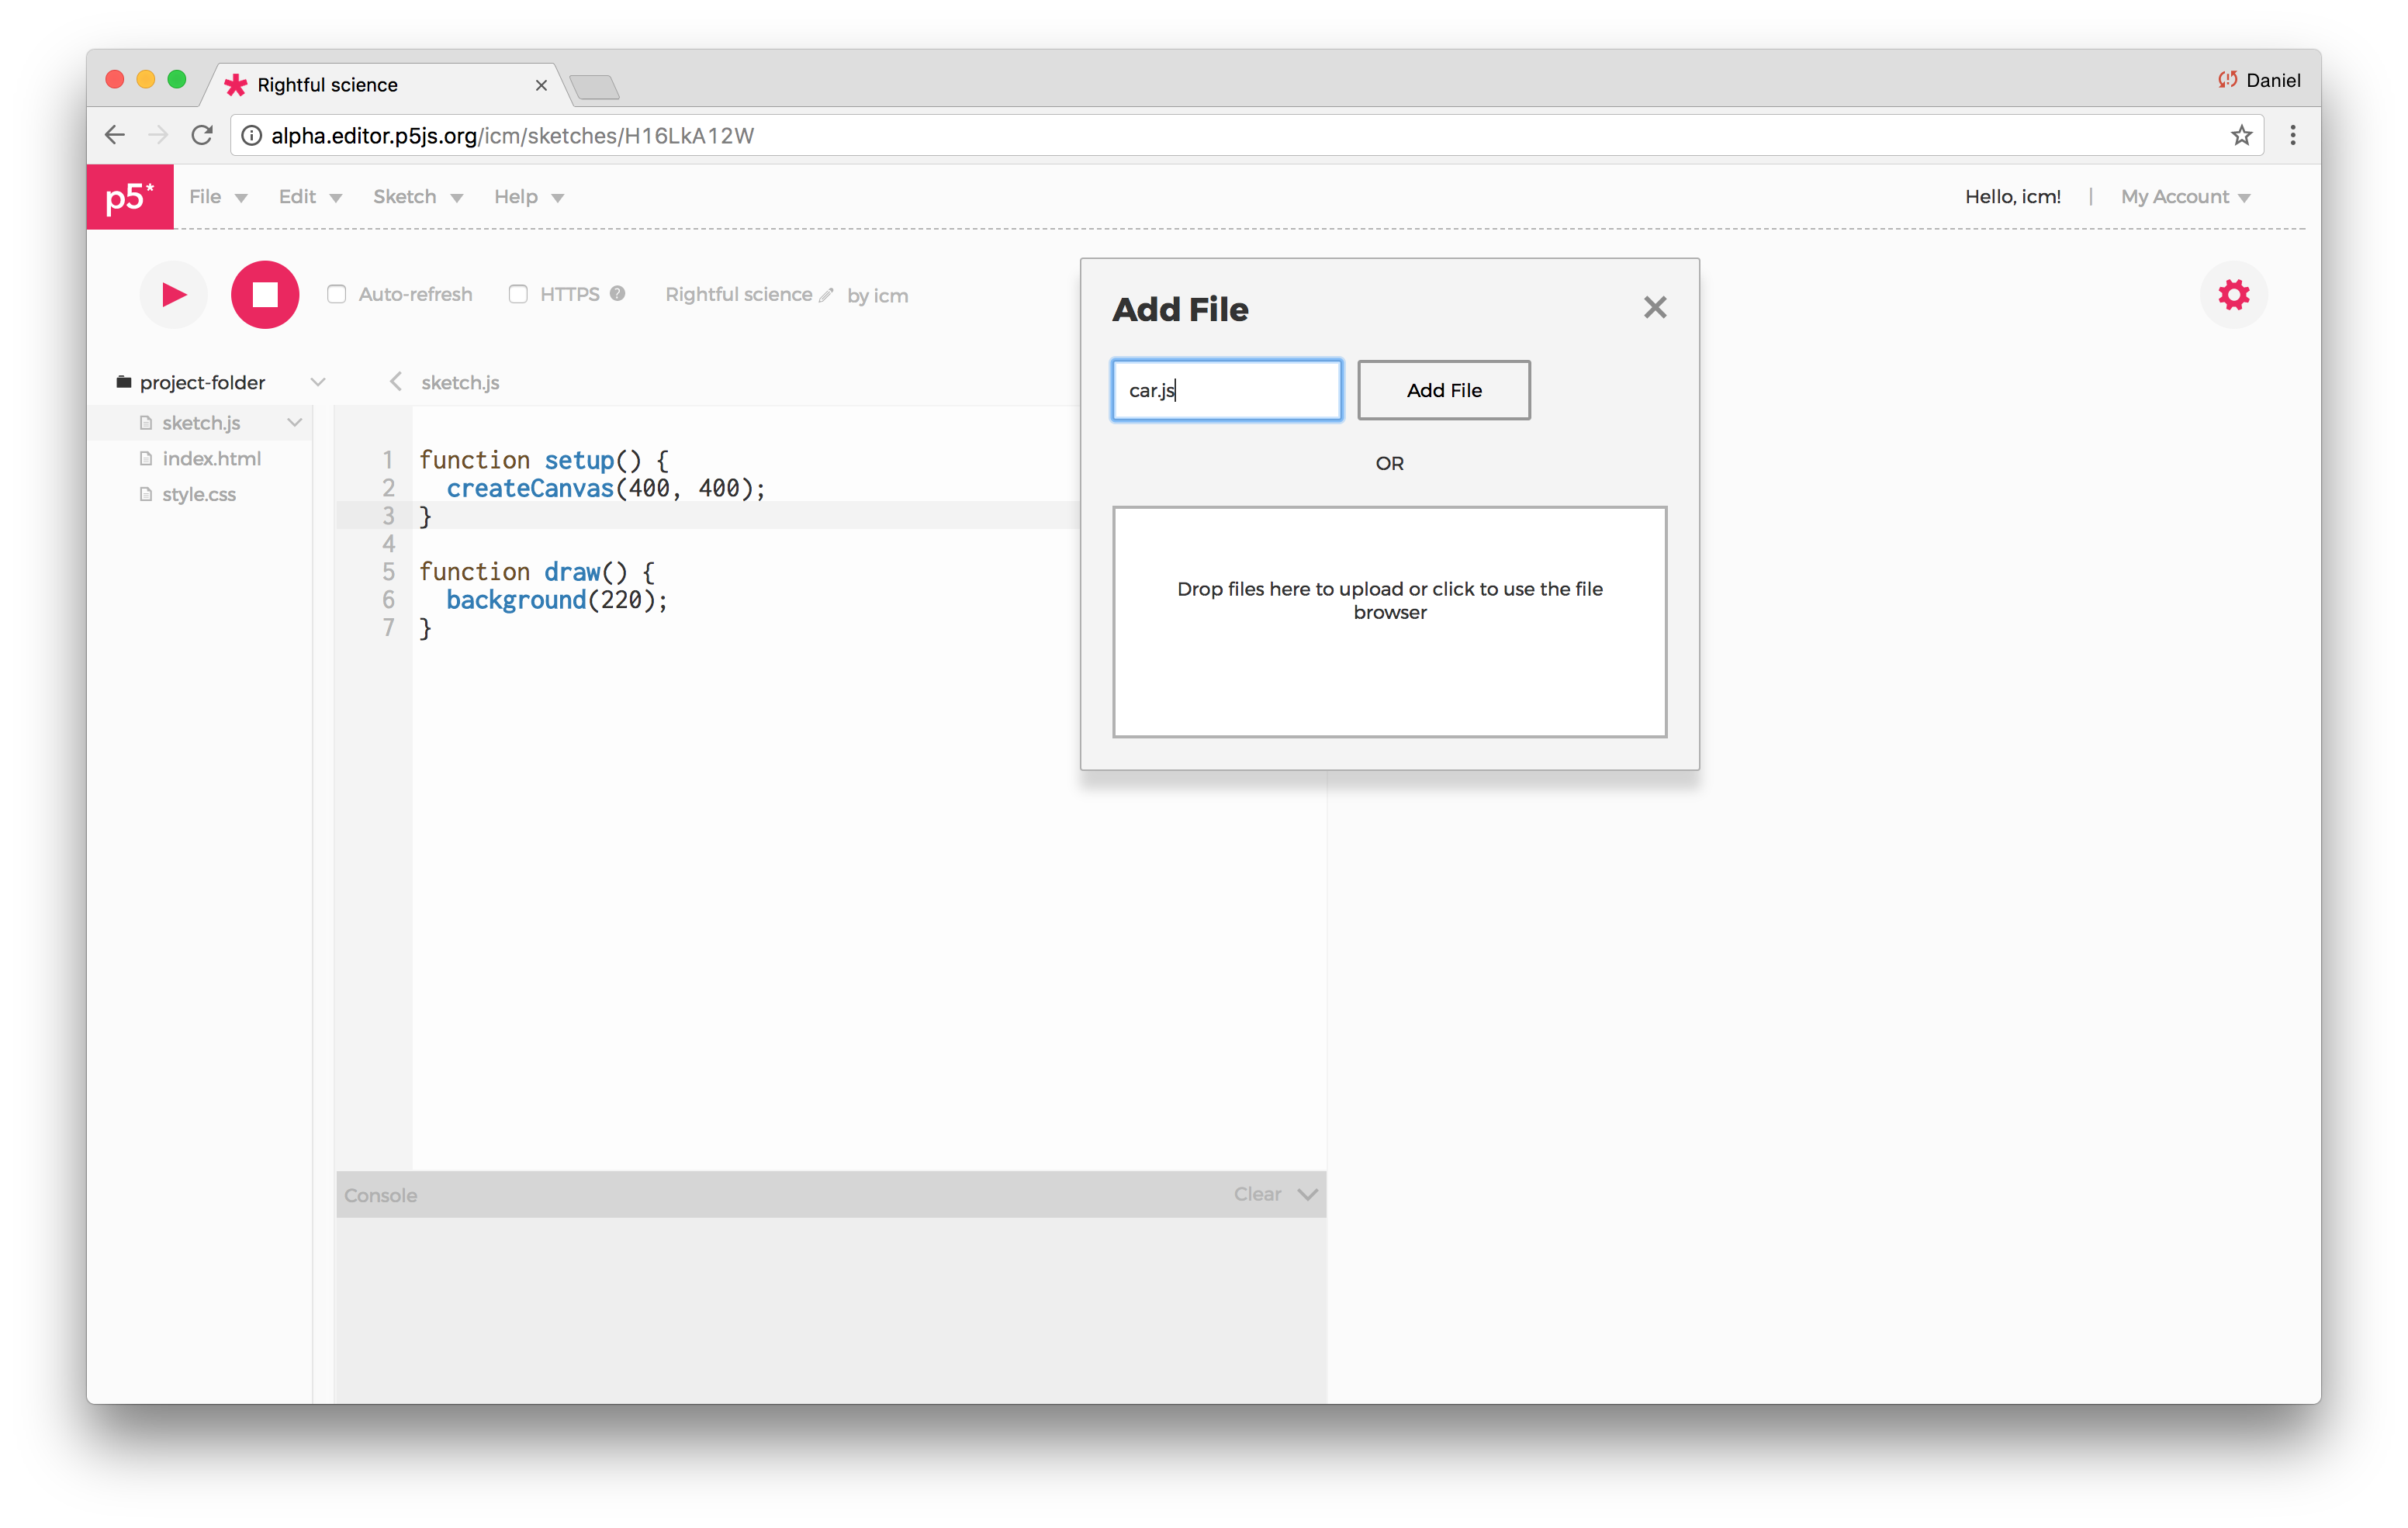
Although you can pick any name you like, it’s probably a good idea to name the file after the class you intend to put there. You'll also want to make sure to use the file extension .js You can then put your main code (setup() and draw()) on the original "sketch.js" file in #fig_08_04_classcodeintab) and type the code for your class in the new one (named “car.js”).
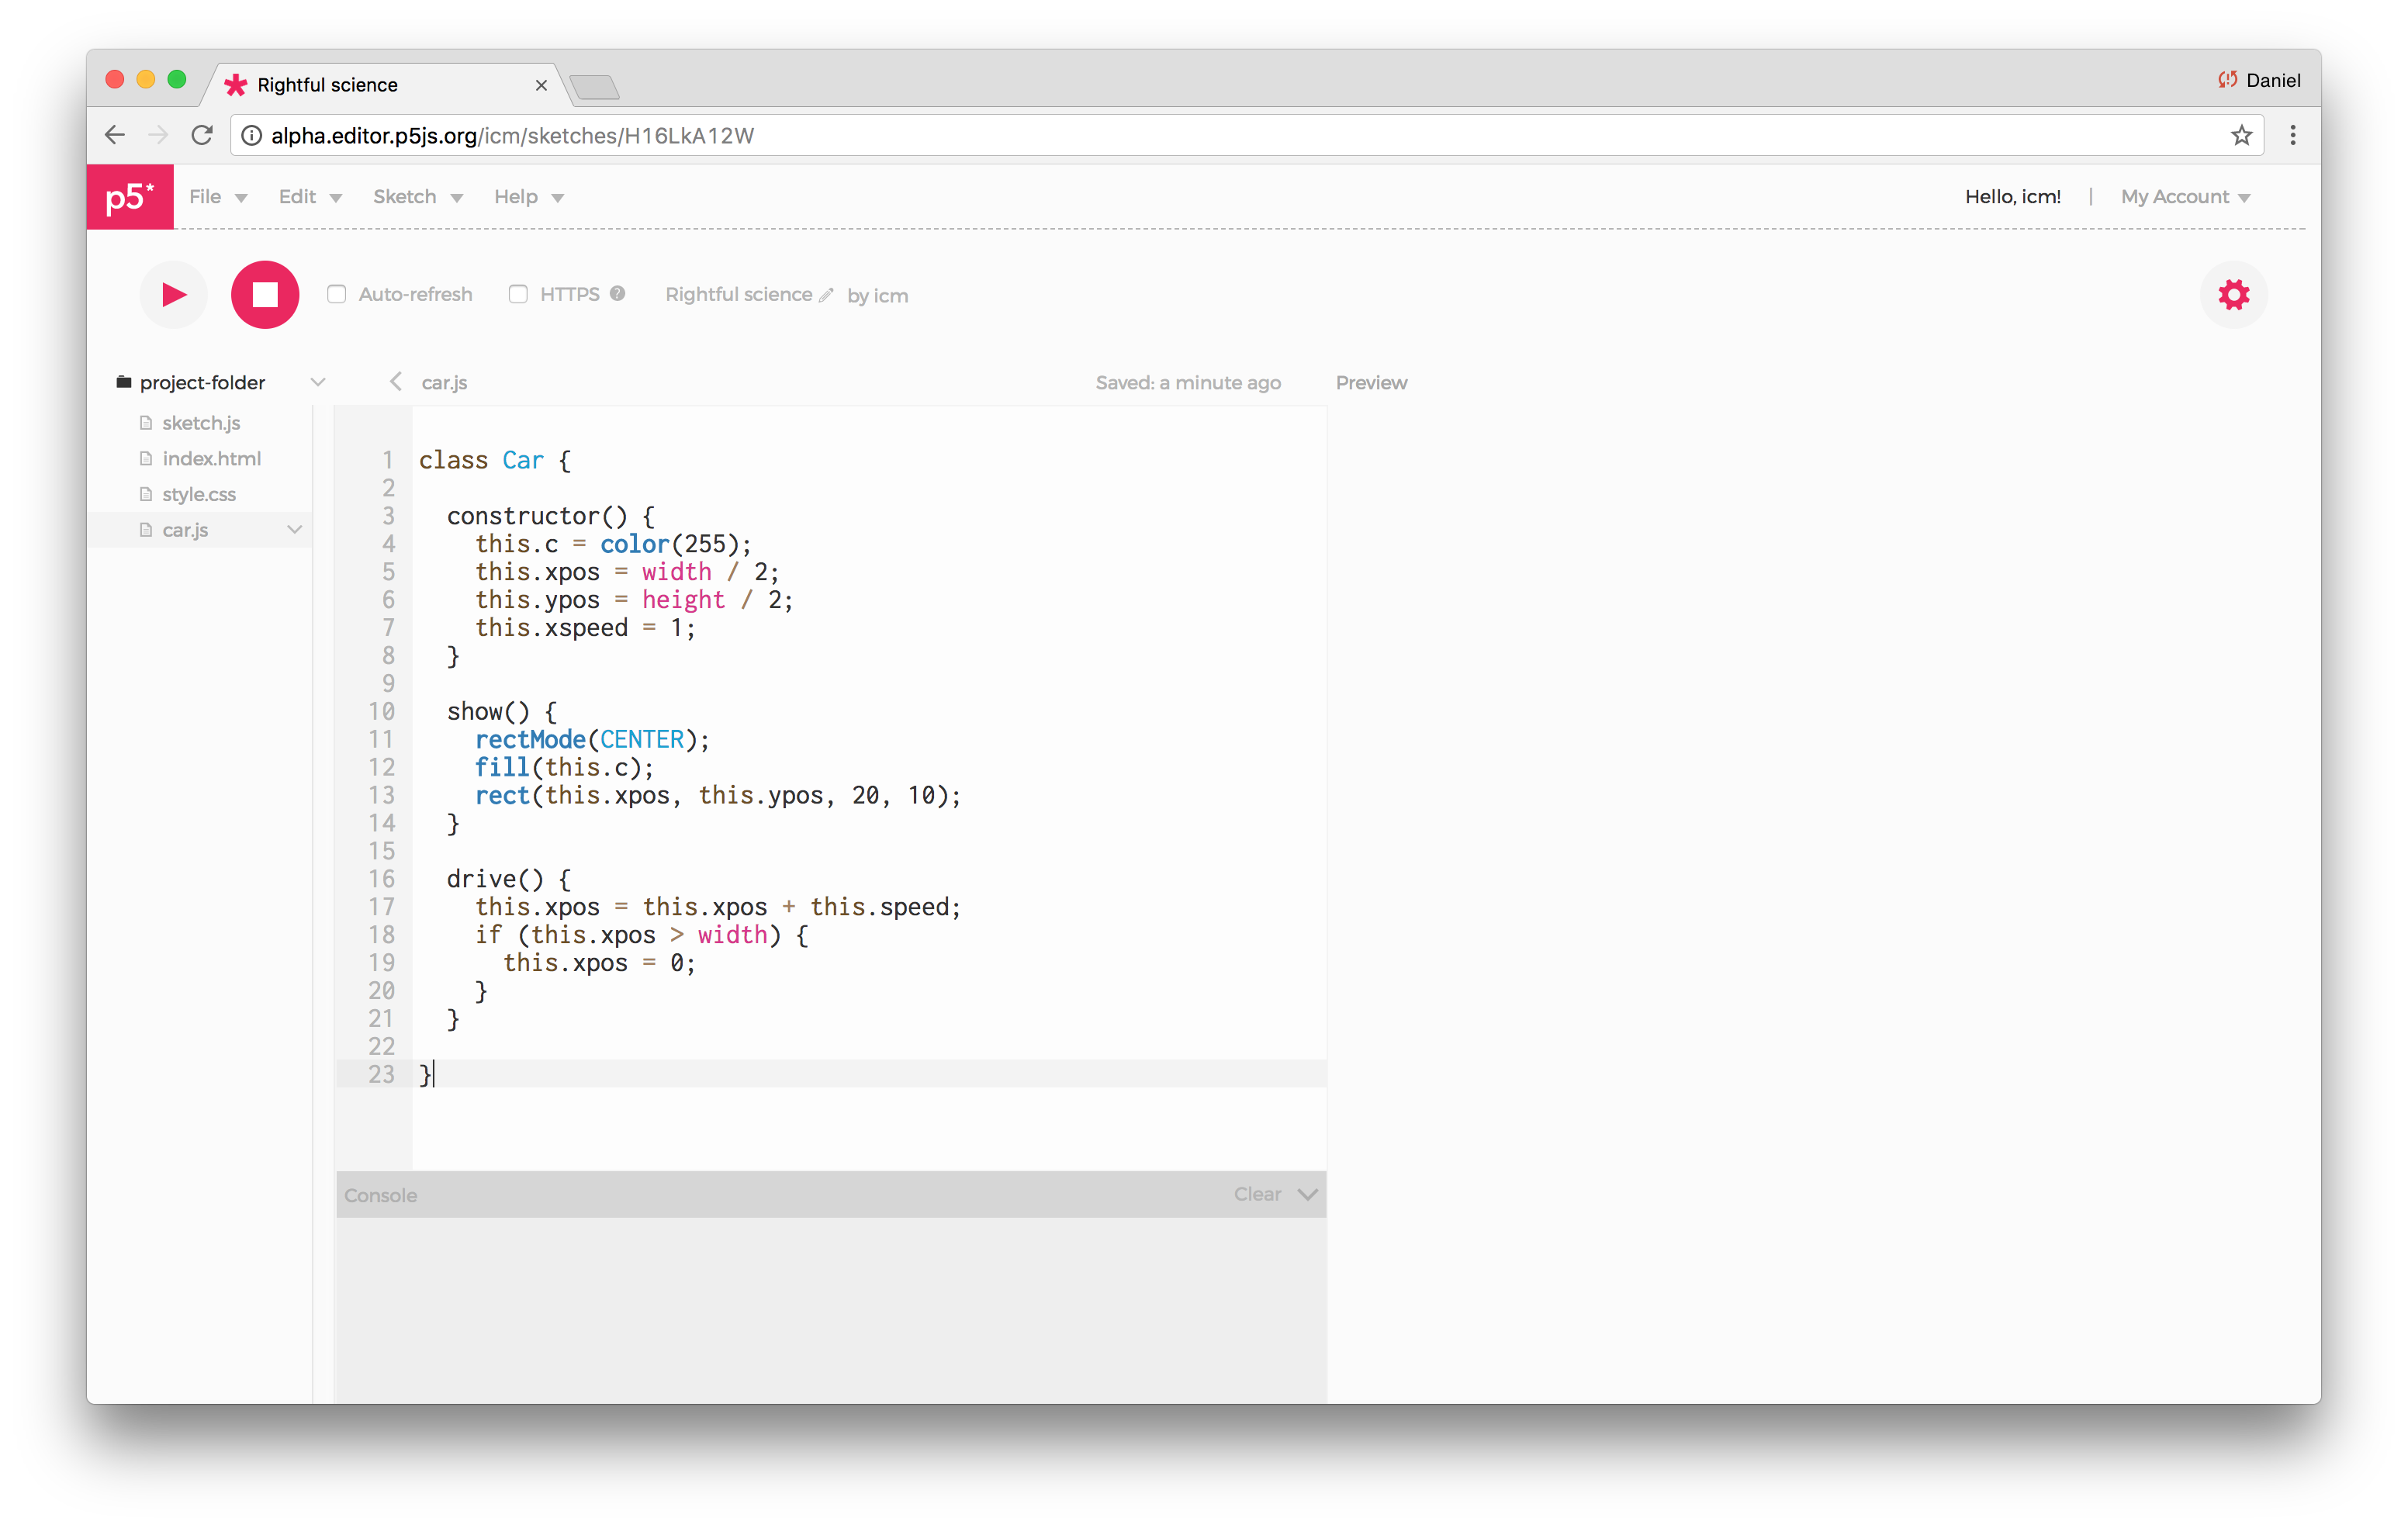
Toggling between the files is simple, just click on the file name in the project folder.
NOTE: ADD HERE A SECTION ABOUT REFERENCING THE FILE IN INDEX.HTML
Constructor arguments
In the previous examples, the car object was initialized using the new operator followed by the constructor for the class.
let myCar = new Car();
This was a useful simplification while you learned the basics of OOP. Nonetheless, there is a rather serious problem with the above code. What if I wanted to write a program with two car objects?
Creating two Car objects.
let myCar1 = new Car();
let myCar2 = new Car();
This accomplishes my goal; the code will produce two car objects, one stored in the variable myCar1 and one in myCar2. However, if you study the Car class, you will notice that these two cars will be identical: each one will be colored white, start in the middle of the screen, and have a speed of 1. In English, the above reads:
Make a new car.
I want to instead say:
Make a new red car, at location (0,10) with a speed of 1.
So that I could also say:
Make a new blue car, at location (0,100) with a speed of 2.
I can do this by placing arguments inside of the call to the constructor.
let myCar = new Car(color(255, 0, 0), 0, 100, 2);
The constructor must be rewritten with parameters to incorporate these arguments:
constructor(c, xpos, ypos, xspeed) {
  this.c = c;
  this.xpos = xpos;
  this.ypos = ypos;
  this.xspeed = speed;
}
In my experience, the use of constructor parameters to initialize object variables can be somewhat bewildering. Please don't blame yourself. The code is strange-looking and can seem awfully redundant: “For every single variable I want to initialize in the constructor, I have to duplicate it with a temporary argument to that constructor?”
Nevertheless, this is quite an important skill to learn, and, ultimately, is one of the things that makes object-oriented programming powerful. But for now, it may feel painful. Let’s briefly revisit parameter passing again to understand how it works in this context. See #ch08fig05.
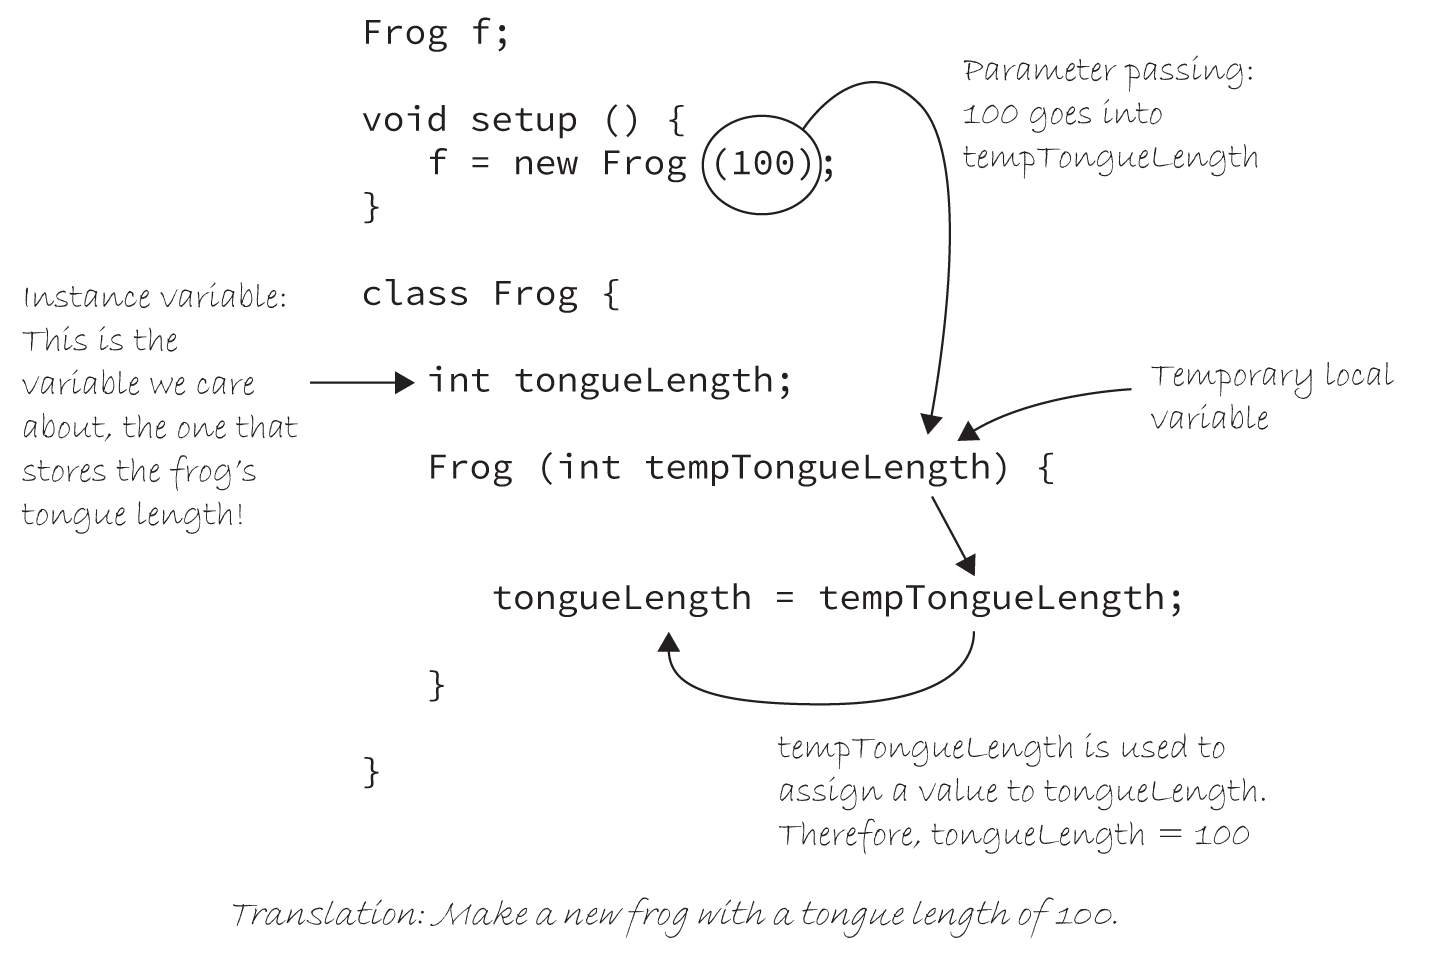
Parameters are local variables used inside the body of a function that get filled with values when the function is called. In the examples, they have one purpose only, to initialize the variables inside of an object. These are the variables that count, the car’s actual color, the car’s actual x location, and so on. The constructor’s arguments are just temporary, and exist solely to pass a value from where the object is made into the object itself.
This allows you to make a variety of objects using the same constructor. It's a little confusing that I've given the constructor parameters the same name as the object's variables. While you might consider writing the word temp in your parameters names to remind you of what is going on (x vs. tempX), it's pretty common practice to give them the same name. We can distinguish between the constructor's parameters and the object's variables by the presence or absence of this.. this.variableName means it's attached to the object, variableName means it's a temporary local variable. You can name these whatever you want, of course. However, it’s advisable to choose a name that makes sense to you, and also to stay consistent.
I can now write the same program with multiple object instances, each with unique properties.
Two Car objects
Two objects!
let myCar1;
let myCar2;
function setup() {
  size(200, 200);
Arguments go inside the parentheses when the object is constructed.
  myCar1 = new Car(color(255, 0, 0), 0, 100, 2);
  myCar2 = new Car(color(0, 0, 255), 0, 10, 1);
}


function draw() {
  background(255);
Even though there are multiple objects, you still only need one class. No matter how many cookies you make, only one cookie cutter is needed. Isn’t object-oriented programming swell?
  myCar1.move();
  myCar1.display();
  myCar2.move();
  myCar2.display();
}


class Car {
The constructor is defined with parameters.
constructor(c, xpos, ypos, xspeed) {
    this.c = c;
    this.xpos = xpos;
    this.ypos = ypos;
    this.xspeed = speed;
  }

  display() {
    stroke(0);
    fill(c);
    rectMode(CENTER);
    rect(xpos, ypos, 20, 10);
  }

  move() {
    xpos = xpos + xspeed;
    if (xpos > width) {
      xpos = 0;
    }
  }

}
Objects are data types too!
This is your first experience with object-oriented programming, so I want to take it easy. The examples in this chapter all use just one class and make, at most, two or three objects from that class. Nevertheless, there are no actual limitations. P5 sketches can include as many classes as you feel like writing. If you were programming the Space Invaders game, for example, you might create a Spaceship class, an Enemy class, and a Bullet class, using an object for each entity in your game.
In addition, although not primitive, classes are data types just like numbers. And since classes are made up of data, an object can therefore contain other objects! For example, let’s assume you had just finished programming a Fork and Spoon class. Moving on to a PlaceSetting class, you would likely include variables for both a Fork object and a Spoon object inside that class itself. This is perfectly reasonable and quite common in object-oriented programming.
class PlaceSetting {

 constructor() {
A class can include other objects among its variables.
   this.fork = new Fork();
   this.spoon = new Spoon();
 }
}
Objects, just like any data type, can also be passed in as arguments to a function. In the Space Invaders game example, if the spaceship shoots the bullet at the enemy, you would probably want to write a function inside the Enemy class to determine if the enemy had been hit by the bullet.
A function can have an object as its parameter.
hit(bullet) {
 // Code to determine if
 // the bullet struck the enemy
}
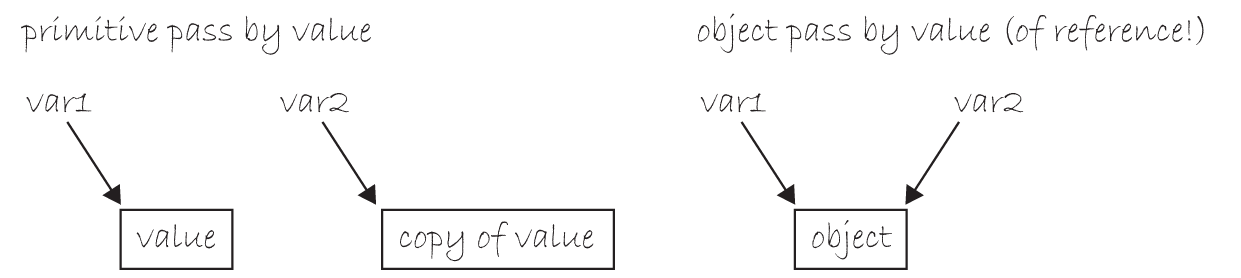
In #functions, I showed how when a number is passed into a function, a copy of the variable is made and the original variable remains the same no matter what happens in the function. This is known as pass by value. With objects, things work a bit differently. If changes are made to an object after it is passed into a function, those changes will affect the original object. Instead of copying the object and passing it into the function, a copy of a reference to the object is passed. You can think of a reference as the address in memory where the object's data is stored. So while there are in fact two distinct variables holding on their own value, that value is simply an address pointing to only one object. Any changes to those object variables affect the same object.
As you move forward through this book and the examples become more advanced, you will see examples that I use multiple objects, pass objects into functions, and more. The next chapter, in fact, focuses on how to make lists of objects. And #algorithms-id00011 walks through the development of a project that includes multiple classes. For now, as I close out the chapter with Zoog, I will stick with just one class.
Object-oriented Zoog
Invariably, the question comes up: “When should I use object-oriented programming?” For me, the answer is always, although now that I'm talking about JavaScript the answer isn't so clear. The advantage is that objects allow you to organize the concepts inside of a software application into modular, reusable packages. However, there are other approaches like "functional programming." For simple drawings and animations, objects are very helpful and you will see them again and again throughout the course of this book. However, it’s not always convenient or necessary to start out every project using object-orientation, especially while you’re learning. p5.js makes it easy to quickly “sketch” out visual ideas with non object-oriented code.
For any p5.js project you want to make, my advice is to take a step-by-step approach. You do not need to start out writing classes for everything you want to try to do. Sketch out your idea first by writing code in setup() and draw(). Nail down the logic of what you want to do as well as how you want it to look. As your project begins to grow, take the time to reorganize your code, perhaps first with functions, then with objects. It’s perfectly acceptable to dedicate a significant chunk of your time to this reorganization process (often referred to as refactoring) without making any changes to the end result, that is, what your sketch looks like and does on screen.
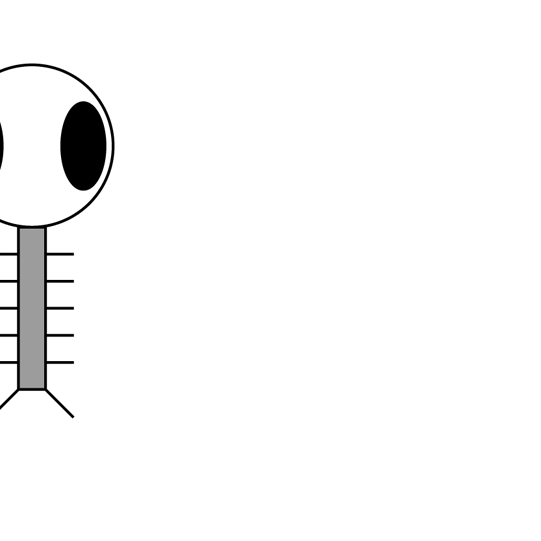
This is exactly what I have been doing with cosmonaut Zoog from #pixels until now. I sketched out Zoog’s look and experimented with some motion behaviors. Now that I have something, I can take the time to refactor by making Zoog into an object. This process will give you a leg up in programming Zoog’s future life in more complex sketches.
And so it is time to take the plunge and make a Zoog class. Our little Zoog is almost all grown up. The following example is virtually identical to #zoog_with_functions (Zoog with functions) with one major difference. All of the variables and all of the functions are now incorporated into the Zoog class with setup() and draw() containing barely any code.
Zoog object
Zoog is an object!
let zoog;
function setup() {
  createCanvas(200, 200);
Zoog is given initial properties via the constructor.
zoog = new Zoog(100, 125, 60, 60, 16);
}


function draw() {
  background(255);
mouseX position determines speed factor
let factor = constrain(mouseX / 10, 0, 5);
Zoog can do stuff with functions!
  zoog.jiggle(factor);
  zoog.display();
}
Everything about Zoog is contained in this one class. Zoog has properties (location, width, height, eye size) and Zoog has abilities (jiggle, display).
class Zoog {
Zoog constructor
constructor(x, y, w, h, eyeSize) {
Zoog's variables
    this.x = tempX;
    this.y = tempY;
    this.w = tempW;
    this.h = tempH;
    this.eyeSize = eyeSize;
}
Move Zoog
jiggle(speed) {
Change the location of Zoog randomly
    x = x + random(-1, 1)*speed;
    y = y + random(-1, 1)*speed;
Constrain Zoog to window
    x = constrain(x, 0, width);
    y = constrain(y, 0, height);
}
Display Zoog
display() {
Set ellipses and rects to CENTER mode
    ellipseMode(CENTER);
    rectMode(CENTER);
Draw Zoog's arms with a for loop
    for (let i = y - h/3; i < y + h/2; i += 10) {
      stroke(0);
      line(x - w/4, i, x + w/4, i);
    }
Draw Zoog's body
    stroke(0);
    fill(175);
    rect(x, y, w/6, h);
Draw Zoog's head
    stroke(0);
    fill(255);
    ellipse(x, y - h, w, h);
Draw Zoog's eyes
    fill(0);
    ellipse(x - w/3, y - h, eyeSize, eyeSize*2);
    ellipse(x + w/3, y - h, eyeSize, eyeSize*2);
Draw Zoog's legs
    stroke(0);
    line(x - w/12, y + h/2, x - w/4, y + h/2 + 10);
    line(x + w/12, y + h/2, x + w/4, y + h/2 + 10);
  }
}
Variable to hold the object.